Tutorial: Scrolling logo bubbles
7 min read. Learn about CSS spritesheets and perlin noise.
Welcome! This is a post in my Dev series, where I attempt to explain and recreate interesting front-end dev techiniques I run across on the web.
In this post, we'll recreate the logo bubbles (see movie above) from the Stripe Customers page.
At-a-glance we can see a few interesting challenges:
- Randomly generating and placing the bubbles on page load
- Animating the smooth up and down movement
- Looping the animation infinitely
Our strategy for this will be to work on the atomic elements (the bubbles), then on placing them, and finally animating them.
Part 1: Creating the bubble
Set up an empty bubble
Create an element with equal width and height, and then turn this square into a circle by setting border-radius: 50%. If you want to nerd out about how exactly a border-radius value affects a shape, check out this Stackoverflow answer.
See the Pen Stripe - Logo Bubble 1.0 by Lokesh Dhakar (@lokesh) on CodePen.
Add the logo
Stripe combines all the logos into a single image file, which is called a spritesheet. You can see it here:

Using a spritesheet is a handy technique to reduce the number of HTTP requests the browser has to make. In this case, 1 file vs 43 files, a big performance win.
Now back to our code… we'll take the logo spritesheet and set it as the background for each of the bubbles. We'll then adjust the size of the spritesheet with the background-size CSS property so that one logo in the image is the size of one bubble.
.bubble {
  background-image: url(stripe-logo-bubbles-spritesheet.png);
  background-size: 1076px 1076px;
}
And then we can use the background-position property to shift the image's position in each bubble and reveal different logos.
.logo1 {
  background-position: 0 0;
}

.logo2 {
  background-position: 0 -154px;
}

.logo3 {
  background-position: 0 -308px;
}
See the Pen Stripe - Logo Bubble 1.1 - Add logos by Lokesh Dhakar (@lokesh) on CodePen.
We'll create the rest of the bubbles in the next section, and we'll do it dynamically with Javascript.
Part 2: Placing and sizing the bubbles
To better understand the placement and sizing logic used, let's take a bird's eye view of the entire header. To do this, open your browser's dev tools and apply transform: scale(0.2) to the header area. This is what we see:

There isn't a quickly discernable pattern. But one thing we notice is that the general placement and sizing of the bubbles is the same on every page load, it's just the logos that are randomized.
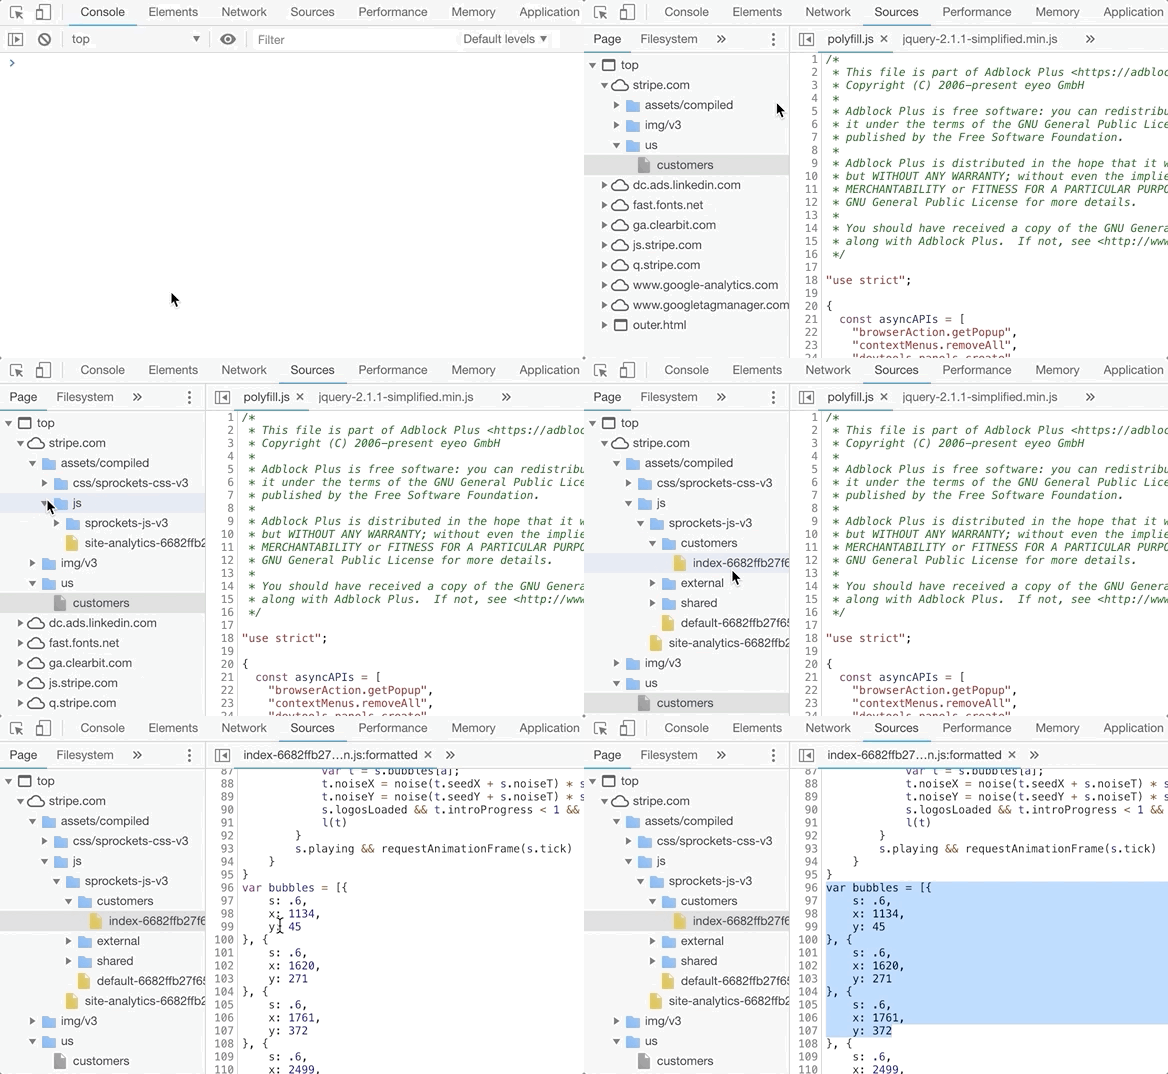
Let's peek at the original code to see if we can get to the bottom of this:

Found it! The positions and sizes are hard coded. Let's copy and paste the values in our code and use it to generate all the bubbles on the fly. We won't worry about randomizing the logos for this exercise.
const bubbles = [{
  s: .6,
  x: 1134,
  y: 45
}, {
  s: .6,
  x: 1620,
  y: 271
},
  ...
];

bubbles.forEach((bubble, index) => {
  let el = document.createElement("div");

  el.className = `bubble logo${index + 1}`;
  el.style.transform = `translate(${bubble.x}px, ${bubble.y}px) scale(${bubble.s})`;

  bubblesEl.appendChild(el);
})
See the Pen Stripe - Logo Bubble 1.2 - Place and size logos by Lokesh Dhakar (@lokesh) on CodePen.
Part 3: Animating and looping
Structuring our code
Before we start animating, let's add some structure to our code so we can support new features and keep things tidy. We'll create two new classes: Bubbles and Bubble.
class Bubbles {
  constructor() { } // For creating the individual bubbles.
  update() { }      // Will be called every frame.
}

class Bubble {
  constructor() { }
  update() { }      // Will be called every frame. Updates the bubble positionn.
}
Adding scrolling (and keeping it performant)
Use transforms
There are two layout related properties that browsers can animate cheaply, thanks to support from the GPU, and these are:
opacityandtransform. It is tempting to use thetopandleftCSS values to move elements around, but modifying them triggers expensive layout calculations that can cause slowdown, so stick totransformandopacity. In our case, we'll use transforms to move the bubbles around.If you'd like to learn more about creating performant animations, check out this classic HTML5 Rocks article.
const SCROLL_SPEED = 0.3; // Pixels to move per frame. At 60fps, this would be 18px a sec.

this.x = this.x - SCROLL_SPEED;
if (this.x <  -200) {
  this.x = CANVAS_WIDTH;
}
style.transform = `translate(${this.x}px, ${this.y}px)`;
Use requestAnimationFrame
If you ever catch yourself using
setIntervalto build out an animation, stop what you're doing, and go read about requestAnimationFrame.
class Bubbles {
  update() {
    // Call each individual bubble's update method
    this.bubbles.forEach(bubble => bubble.update());

    // Queue up another update() method call on the next frame
    requestAnimationFrame(this.update.bind(this))
  }
}
See the Pen Stripe - Logo Bubble 1.3 - Animating and looping by Lokesh Dhakar (@lokesh) on CodePen.
Making the animation feel organic
We have movement, but it feels stale. How do we get that organic bobbing and weaving that the Stripe page has? We could create three or four predefined CSS animations and apply them with random delays to the bubbles. That world probably work, but there is a more elegant solution... inject some noise, perlin noise to be specific.
Perlin noise is an algorithm for generating 'randomness'. But unlike your normal Math.random() output which produces random values that have no relationship with the previously generated values, perlin noise allows us to create a sequence of 'random' values that have some order and create a smooth, organic appearance.
The easiest way to understand the difference is to plot the values out. In the diagram below, we plot the output of Math.random() on top and the output of noise.simplex2(), a 2d perlin noise function, on the bottom.
Here is our Bubble class's update() method before:
update() {
  this.x = this.x - SCROLL_SPEED;
  if (this.x <  -200) {
    this.x = CANVAS_WIDTH;
  }
  this.el.style.transform = `translate(${this.x}px, ${this.y}px) scale(${this.scale})`;
}
And here it is after introducing perlin noise:
const NOISE_SPEED = 0.004; // The frequency. Smaller for flat slopes, higher for jagged spikes.
const NOISE_AMOUNT = 5;    // The amplitude. The amount the noise affects the movement.

update() {
  this.noiseSeedX += NOISE_SPEED;
  this.noiseSeedY += NOISE_SPEED;

  // The noise library we're using: https://github.com/josephg/noisejs
  let randomX = noise.simplex2(this.noiseSeedX, 0);
  let randomY = noise.simplex2(this.noiseSeedY, 0);

  this.x -= SCROLL_SPEED;
  this.xWithNoise = this.x + (randomX * NOISE_AMOUNT);
  this.yWithNoise = this.y + (randomY * NOISE_AMOUNT)

  if (this.x <  -200) {
    this.x = CANVAS_WIDTH;
  }

  this.el.style.transform = `translate(${this.xWithNoise}px, ${this.yWithNoise}px) scale(${this.scale})`;
}
I'm keeping the perlin noise implementation discussion brief in this post, so if you have questions or want to learn more, I'd recommend checking out the Introduction from The Nature of Code.
With the perlin noise added and the noise parameters finetuned...
🏁 Logo bubbles
See the Pen Stripe - Logo Bubble 3.1 - Perlin noise by Lokesh Dhakar (@lokesh) on CodePen.
I hope you enjoyed this post and learned something new. If you did enjoy it, check out the full listing of posts for more from the Dev series.
And send me your thoughts while they are fresh in your mind. What parts did you like? What parts were confusing? What would you like to learn about next?
And lastly, follow me on Twitter to find out when the next post is up.